Service Host Local System High Disk Usage: Task Manager is a utility service provided by the windows that help us check the origination of our problem. Opening task manager and checking which process is taking up the most disk space, and memory is one of the foremost tasks to be done. Then, we need to make sure that terminating the process won’t affect the system at all.
We usually get Service Host Local System High Disk Usage error when the Service Host Local System uses up all the resources of the operating system itself, thus, generating an everlasting problem with the system.
It is one of the fundamental processes of our operating system, and we need to be careful while tackling Service Host Local System High Disk Usage error. We have come up with ways to handle this error tactfully with finesse, but it is essential that you do not harm your system in any case.
Contents
How to Fix Service Host Local System High Disk Usage in Windows 10
Solution 1: Repair Windows Update
Windows Update is one of the processes which can always be counted upon to fix blatant errors. But sometimes updating the windows can prove to be counter-productive, causing new errors that have to be dealt with by troubleshooting the error.
Step 1 – Use the shortcut Windows + S to open the search bar and search Control Panel.
Step 2 – Then, select System and Security. After that, choose “Security and Maintenance” from the list which will appear.
Step 3 – Navigate to “Troubleshooting.” Then select “Fix Problem with Windows Update,” which can be seen just below.
Step 4 – Next, start troubleshooting the error with administrator privileges.
Step 5 – At last, restart your system.
Solution 2: End Running Tasks
Each error encountered is originated from particular services. We need to find those services and make changes to them to be able to counter the high disk age usage with proper efficiency.
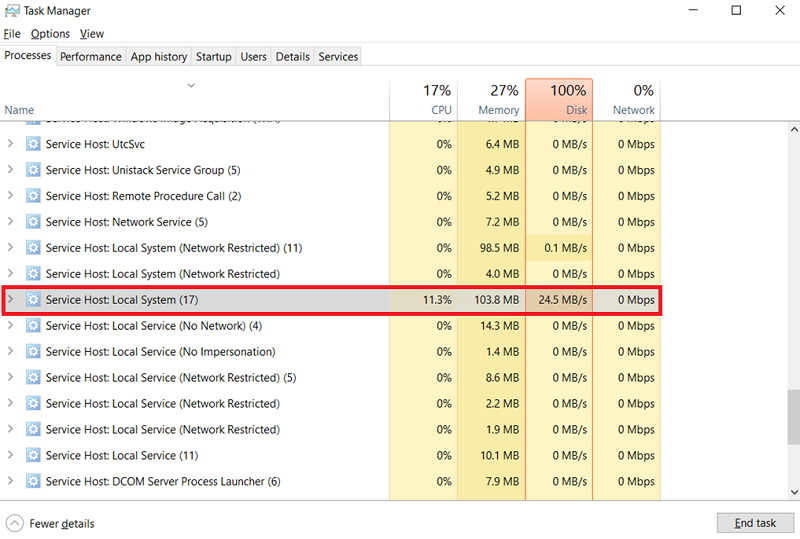
Step 1 – Use shortcut Windows + Shift + Esc to open Task Manager. Then, open the “Processor” tab amongst all tabs.
Step 2 – In the long list of processes, search for the Service Host: Local System. It will help to find out the other processes associated with it.
Step 3 – Carefully select the processes under it and terminate them using “End Task.”
Step 4 – Watch out for the files having the most significant impact on CPU usage. Terminate them by right-clicking on them and choose “Open Services” and then select “Stop.”
Solution 3: Set A Metered Connection
Service Host Local System takes up a lot of allocated disk space as well as the network connection. To solve the problem at hand, you can change your Internet connection to a metered connection by following the below process:
Step 1 – Firstly, open “Settings” using shortcut Windows + i. Then, choose “Network & Internet.”
Step 2 – Next, navigate to the left-hand pane and select “WiFi.”
Step 3 – Now, scroll down till you reach the “Metered Connection” option. Select “Set as Metered Connection” and enable it.
Solution 4: Update Device Drivers to Latest Version
The drivers help in the interaction of the system and the applications or programs installed. The drivers should always be updated. Check for updates by following these steps:
Step 1 – Firstly, right-click on “This PC.” A list of surfaces and chooses “Properties” from the list.
Step 2 – Go into the “devices manager” and look for yellow exclamation marks amongst the listed devices.
Step 3 – Right-click on them and select “Update Driver” option.
After updating, restart your PC to implement the changes.
Solution 5: Disable SuperFetch
The most significant plus point of using Windows is that Windows provides us with Command prompt. Command Prompt can be regarded as the savior for all problems. Using prompt, we can get rid of the Host Local System High Disk Usage by a few commands.
Step 1 – Start “Run” from the search bar or use Windows + R to do so directly. Now, type “cmd”. Then press Enter in order to open Command Prompt.
Step 2 – Now, enter the command:
net.exe stop superfetch
Step 3 – The next command ensures that the error is completely rooted out. And press “Y” when asked to confirm your choice.
chkdsk.exe /f /r
Step 4 – Restart your PC and check if the error still persists.
Solution 6: Disable Automatic Updates
Windows automatically deals with all the update patches. To switch the Windows updates to the manual mode and getting to know the intimate details about the updates is one of the most efficient ways to solve this issue.
Step 1 – Start “Run” by using the shortcut Windows + R. Then, enter “services.msc” to open the services part of the Windows settings.
Step 2 – Next, scroll down until you reach the service that is named as “Windows update Properties” and open the same.
Step 3 – Choose “Manual” from the list shown in the “Startup Type” section. Select “Stop” present in the Service Status section if the service is already running.
Step 4 – Don’t forget to click on Apply first before choosing the OK option.
It is imperative to know that every time Windows comes up with an update, they take care of various small issues to more significant security problems. Therefore, it is highly recommended to check for updates since you have set it on the manual mode.
Recommended:
- Ntoskrnl.exe High CPU or Disk Usage
- Avast Service High CPU Usages
- What is DISM Host Servicing Process and Fix DismHost.exe Errors
- CompatTelRunner.exe High CPU and Disk Usage
Final Words
Microsoft, while being one of the largest corporations in the world, always wants to give its users the best service. However, they can’t look at each problem faced by the user simultaneously. While there isn’t a solid fix for this issue provided by Microsoft yet, it is definitely on their agenda.
The heavy usage of CPU is the cause of the problem. It can be easily solved with the following methods, and you can get back to your everyday life problems knowing that this issue won’t be one of them.


