System Interrupts are a fundamental part of Windows. And while it cannot be categorized exactly as a process but it can act as a holder used to display the system resources used by all the hardware interrupts on your system. To effectively manage and run many activities simultaneously, it is imperative to have hardware interrupts.
Its an important part of the OS to be able to prioritize the processes, which is where interrupt comes in play. Interrupts are used as the middleman, emphasizing the essential instructions to be executed right away. It is done either by suspending some other process or by just alerting the CPU that the higher priority instructions are all set to be executed. Hundreds of processes have to work simultaneously to ensure the smooth run of the OS.
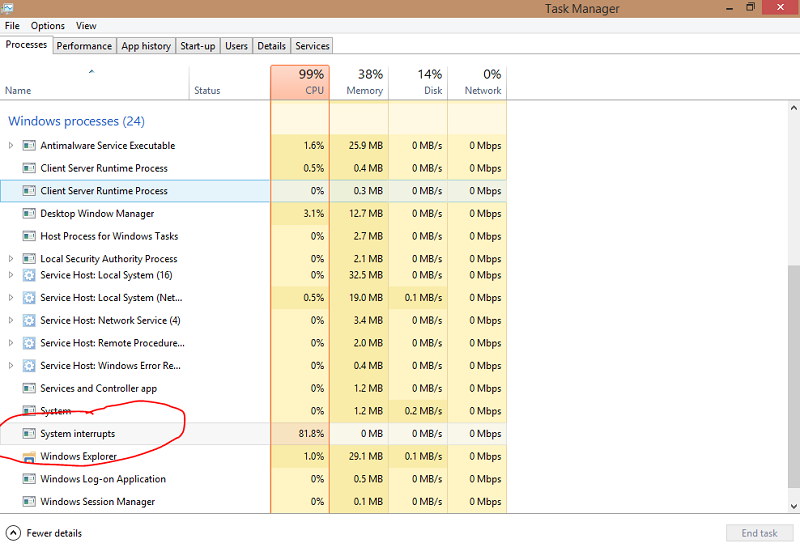
The “System interrupts” are an important part of the operating system. But it is designed in such a way that it shouldn’t affect more than 2-3 % of the overall performance. If the process jumps to around 20% and stays there, you need to start working on all possible solutions. These problems can be traced back to some factors like that of corrupt drivers, external devices, and fast Startup or boot, etc.
Contents
How to Fix System Interrupts High CPU Usage in Windows 10, 8 and 7
Solution 1: Disable USB Root Hubs
Ever wondered why you could connect a wide range of peripherals to your computer? Its because of the USB Root Hub. Its a software driver that lets you connect multiple USB devices to your system. Most systems have multiple USB root hubs allowing you to share data across many devices.
It is pertinent that we disable USB root hubs, not in use, for your input devices such as keyboards or mouse. Firstly, we determine which USB root hubs these devices are using. Then disable all the extra ones, which would, in turn, fix the System Interrupts High CPU Usage.
Step 1 – First of all, press the Windows + R key combination.
Step 2 – Then, type the command “devmgmt.msc” to open Device Manager. Once within the device, open “Universal Serial Bus Controllers” seek the list of root hubs.
Step 3 – Next, right-click on the root hub and choose “Properties.” Once within the properties, open the tab of “Power” and check if your devices are hooked up there. Your mouse and keyboard ought to show up if they have any involvement with this root hub. If they are, disable all the other root hubs with this as an exception.
Step 4 – After identifying the root hub in use by your mouse and keyboard, disable all the other root hubs by right-clicking it and choosing “Disable.”
Step 5 – At last, reboot your system to implement the changes.
If this solution didn’t work for you, it is always possible to revert the original settings.
Solution 2: Disable Audio Enhancements
Windows has a lot of drivers and software, ensuring the optimum performance for users. There are a lot of sound drivers which use enhancements in an attempt to provide us with the best sound quality. If these enhancements have properties that are not compatible with your system, this results in the System Interrupts High CPU Usage error we see.
So, the obvious solution would be to disable the audio enhancements and check for if the problem is solved. But we have to be careful as the enhancement tab could be renamed as sound blasters. Therefore, we should try to disable the effects of the audio.
You ever wondered how a third-party application has the control of your system’s sound and equalizer. It is because of a feature named “Exclusive mode,” which lets other applications override the sound settings. This exclusive model isn’t always helpful as some sound drivers tend to have problems with it. It is not necessarily a problem, but we must try all possible solutions to solve the issue.
Step 1 – Firstly, use the shortcut Windows + I to open Settings. Then type “Control Panel” in the search bar at the top and open the same.
Step 2 – Once the control panel is expanded, type “sound” on the search bar at the top right corner of the screen. Open the options of sound.
Step 3 – Once the sound choices are opened, click on the audio device connected to your system. Right-click and choose Properties.
Step 4 – Navigate to the “Enhancement Tabs” to uncheck all enhancements enabled. Or directly select the “Disable All Enhancements.”
Step 5 – Choose the “Advanced” tab and uncheck the exclusive mode feature. Save your changes and exit.
Solution 3: Disable the Wake on Magic Packet Settings
There is a fantastic feature on Windows where your network adapter has certain advantages that allow you to wake up your system on the transmission of data. This specific data packet is termed as “Wake on Magic Packet” by Windows.
This data packet seems to be the reason for high CPU data usage as it generates many interrupts, and the system has to correspond with all of them. We can try and disable this particular option from settings, but if it doesn’t work, we can also revert to the original settings.
Step 1 – Firstly, press Windows + R to launch the Run application on your computer. Then type the command “devmgmt.msc” to launch the device manager.
Step 2 – In the device manager, all the devices connected to your system will be categorized and presented to you for convenience.
Step 3 – Next, select Network Adapters, which prompts open a list of devices. Choose Ethernet and WiFi devices and Open their “Properties.”
Step 4 – Now, open the Advanced tab amongst all tabs. After that, search for the “Wake on Magic Packet” option. Then, select Disabled, save changes, and exit.
Step 5 – Finally, restart your computer if needed and check if the System Interrupts High CPU Usage error persists.
Solution 4: Install Intel Rapid Storage Technology
Intel Rapid Storage Technology is a fantastic application feature used by the windows to increase the efficiency and authenticity for the systems which use SATA disks for a variety of gadgets like server platforms, phones, or even desktops. You are in even greater luck if your device is using multiple SATA disk drives.
It is because it exponentially increases the efficacy by saving the power consumption in sync with enhancing the performance. Usage of multiple disks provides you with a better safety net for having a backup and staying secure from data loss caused in an unlikely event of disk failure.
There were a few scenarios where users observed that installing the Intel Rapid Storage Technology module has been beneficial for them. Its imperative for you to realize that this would be replacing the SATA controller driver with a guarantee that installation won’t cause any hindrance whatsoever.
If you are well versed in the mechanics, you can simply visit Intel’s official website and use their manual to install the module.
Solution 5: Turn off Fast Startup
Windows 10 has a feature of fast Startup that combines the components cold shutdown and the hibernate feature. Upon shut down, Windows logs off all users and closes all applications similar to the cold boot. Windows now act as the same way it does when it is rebooted for the first time (as all users are logged off, and applications are closed). The kernel has already loaded itself up while the system session is running simultaneously.
Windows ultimate goal is to provide users with better and faster and accurate processes. In a bid to save time for a faster startup, Windows sends a notification to devise drivers to prepare for hibernation and saves the current system state to hibernation before ultimately turning off the system.
As we can see, this is not the traditional way of shutting down systems. It has been found that disabling this particular feature saves the system from High CPU usage.
Step 1 – Firstly, open Run by Windows + R. In the dialogue box type “Control Panel” and hit Enter to launch the control panel.
Step 2 – Secondly, select “Power Options” from the control panel list of options. Then open “Choose what the power buttons do,” which can be seen on the left pane.
Step 3 – Now, you will have to select an option that requires administrative privileges named “Change Settings that are currently unavailable.”
Step 4 – Navigate towards the rear end of the screen and uncheck the “Turn on fast startup” option. Save changes and exit.
Step 5 – Restart your system to check whether the changes implemented have been fruitful or not.
Solution 6: Troubleshoot Devices and Drivers
Since none of the above methods have been fruitful, now we have to find the particular device or driver causing the problem. We need to go for the elimination method by firstly disconnecting all the external devices and then move on to the internal devices. The elimination process also includes updating the drivers to ensure all bases are covered.
1. Disconnect All External Devices – Disconnect them in an orderly fashion and observe the CPU usage readings. If disconnecting a device lowers the usage by a minimum of 2-3%, it means the faulty device has been found.
2. If None of the External Devices Shows Any Fault – Start with the internal devices now. This is a little complex as compared to the previous one, as it involves disconnecting them from the device manager. It is imperative that you absolutely avoid disabling important systems like disk drives or display adapters etc.
3. Automatic Updates Aren’t Always the Best Option – Instead, we have to manually check every update by updating drivers to the latest build available, and if you don’t see any difference, revert back to what it was. You have to download the drivers from your manufacturer’s website and be extra cautious while making changes to the system.
Recommended:
- Ntoskrnl.exe High CPU or Disk Usage
- CompatTelRunner.exe High CPU and Disk Usage
- Avast Service High CPU Usages
- WMI Provider Host High CPU Usage
Final Words
The high CPU usage can more often than not lead to overheating of the system, which in turn can be very dangerous for your system. Therefore, it is important to keep caution and ensure that your system works in optimal conditions without having an intense effect on its computing powers. Thank You For Reading!


