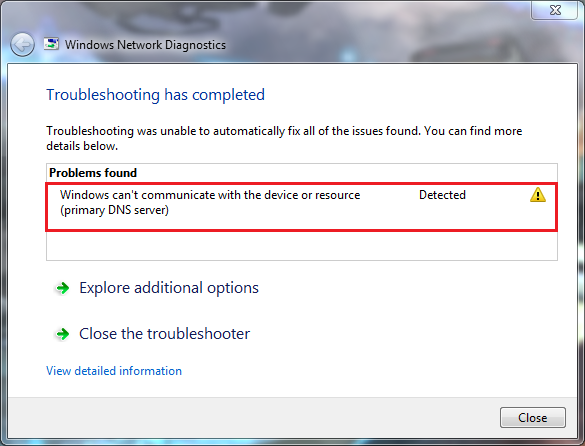
If you aren’t able to connect to the internet, then troubleshoot the problem using the Windows Network Diagnostics tool. But if the troubleshooting gets completed and then you get this error message that says Windows can’t Communicate With the Device or the Resource (primary DNS server).
Now, you don’t know how to solve Windows Can’t Communicate With the Device or Resource problem; then, you can fix the error with the solutions mentioned below. This network problem is most likely caused by the DNS (Domain Name Server) issues and network driver issues.
Contents
How to Fix Windows Can’t Communicate With the Device or Resource Error
I have mentioned five solutions which you can try to fix it. However, there is no need for you to try all of them; just find the one that works for you. All of the solutions can be applied on Windows 10, 7, 8, 8.1.
Solution 1 – Resetting Internet Protocol (TCP/IP)
Corrupted Internet Protocol (TCP/IP) can also be the reason for receiving Windows Can’t Communicate With the Device or Resource error message. IP is one of the main components which is required by the operating system for connecting successfully to the internet. So, we will try resetting the TCP/IP of your computer and see if this solves the problem.
It can be done by downloading a tool from Microsoft and then running it on the affected computer. For downloading the tool, you will need another device with an internet connection.
Step 1: Firstly, go to Microsoft’s official website and download the utility.
Step 2: Then, double click on the file downloaded and restart your computer after performing all the operations. After that, see if the Windows Can’t Communicate With the Device or Resource issue is resolved.
Solution 2 – Changing the IPv4 and IPv6 Settings
The IPv4 means Internet Protocol version 4, and it is a protocol for use on packet-switched link-layer networks. IPv4 also provides an addressing capability of approximately 4.3 billion addresses. The Internet Protocol version 6 (IPv6) is a bit more advanced and also has better features compared to the IPv4. It also can provide various addresses.
We are going to change the settings of both of them and see if this solves the issue. This solution is mostly used for solving this problem:
Step 1: First of all, apply the shortcut “Windows + R.” Then type “Control Panel” in the search box.
Step 2: After opening the control panel, click on the “Network and Internet” option. Then, find “Network and Sharing Center” and then click on it.
Step 3: Now, you will see the network to which you are connected. Tap on the network, which is present in front of the connections.
Step 4: Then click on the Properties, which is present at the bottom – left corner of the screen.
Step 5: Locate Internet Protocol Version 4 (TCP/IPv4) and then click on it. Tick on the options “Obtain DNS server address automatically” and “Obtain an IP address automatically.” Finally, press OK to save the changes.
Step 6: Repeat the same procedure with Internet Protocol Version 6 (TCP/IPv6).
Step 7: At last, check that the Windows Can’t Communicate With the Device or Resource issue is resolved or not.
Solution 3 – Using the Command prompt to Reset the Connection Settings
It may be the case that IP and DNS configuration are either corrupt or not configured as expected. If so, we can try resetting these settings and see if this solves the problem:
Step 1: First of all, apply the shortcut “Windows + R.” After that, “Command Prompt” in the search box.
Step 2: Then, right-click on the first result and tap on “Run as administrator.”
Step 3: Once the command prompt gets opened, execute the commands given below.
ipconfig /flushdns
ipconfig /registerdns
ipconfig /release
ipconfig /renew
Step 4: At last, close the command prompt after executing the above commands and reboot your computer.
Furthermore, check that the Windows Can’t Communicate With the Device or Resource issue is resolved or not.
Solution 4 – Restarting Modem and Router
The internet router may be saved at the wrong configuration. Or any other settings, which can be its reason for not working correctly. Try restarting the router, but if it doesn’t work, you can try resetting the router (hard-reset) manually and check if it improves our situation.
Step 1: Firstly, pick up the router and turn it back to see all the ports.
Step 2: Now, find the button named “reset.” If you don’t find any button, then use a thin pin to press inwards towards the hole, which is called “reset.”
Step 3: After resetting the router, connect your computer to the Wi-Fi network. Then launch steam and see if the problem is resolved.
Solution 5 – Updating the Network Driver
The reason for this problem can be a faulty network driver. For resolving this problem, you can update your network driver. So, there are two ways for updating the driver, i.e., manually and automatically.
Manual Driver Update:
Firstly, go to the manufacturer’s website for your network card, and search for the most recent correct driver. Make sure that the drivers that you choose are compatible with your windows version.
Automatic Driver Update:
If you think that you cannot update your network card manually, then the alternative is of doing it with automatically driver updating tool. These tools will automatically recognize your system and then find the correct drivers for the network card, and windows, and it will download and install them correctly. Obey the following steps for an automatic driver update:
Step 1: Firstly, download and install the Automatic Driver Update Software.
Step 2: Now, run driver easy and then click scan now button. Driver Easy is now going to scan your computer and detect problems with the drivers.
Step 3: Then, tap on Update Button, and then it will install the correct version of that driver.
Another method of doing this is by clicking on update all. Doing so will automatically download and install the correct versions of all drivers which are missing on your system.
Step 4: Once the driver gets updated, to check that the Windows Can’t Communicate With the Device or Resource problem is solved.
Recommended:
- Data Error Cyclic Redundancy Check
- Windows Update Service Not Running
- Taskbar Showing in Fullscreen
- Windows Modules Installer Worker High CPU
Final Words
Please note that after you manually reset the router, it won’t have any SSID (password), and the name of the WiFi will be set as default. Any internet settings which your internet provider has set on it will be removed. Do not perform this method if you don’t know those settings. All the devices which were connected are also going to disconnect. I hope this guide proves useful to you.


 error can stop your Internet and other things, so let us fix this error now!)