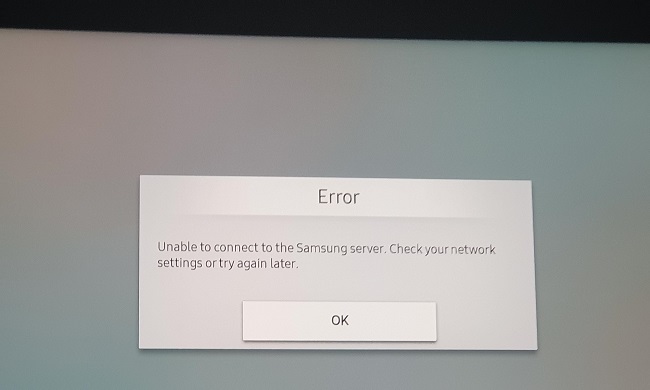
The “unable to connect to Samsung Server” problem message is typically displayed while watching the online material on the Samsung smart TV. A brief error notice reading “Unable to connect to the Samsung server” displays.
The error message “Please check your network settings or try again later (100)” is followed by a solution that does not function.
Contents
Method 1: Perform A Soft Reset on Your TV.
Many customers have reported that performing a soft reset on their Samsung smart TV fixed the issue. When you perform a soft reset on your TV, all open programmes are closed, and the RAM is cleared, putting an end to any background processes.
So, just do what it says:
Step 1: Turn the TV on first.
Step 2: Next, keep holding down the power button on the remote until the TV turns back on.
Step 3: Now that you’ve restarted your TV, you can see if the problem persists.
Method 2: Switch between signed out and signed in states on your Samsung account.
It is possible that logging out and back in will solve your problem. Sometimes, synchronisation stops working for no apparent reason, but logging out and back into your Samsung account fixes the problem.
Do this, and as soon as you re-sign in, your account will begin synchronising with your Smart HUB and TV. If you routinely sync your account with your Samsung TV, you won’t experience the error, which occurs when your Samsung account stops communicating with your TV.
To do this, just follow the on-screen prompts:
Step 1: Visit the Preferences page. To access your Samsung account, select General, then System Manager.
Step 2: Click “My Account” and then mouse over the account’s icon.
Step 3: To log out, press the choose button on your remote and then the appropriate button on the screen.
Step 4: Another option is to log out of your account and then reset your Smart Hub.
Step 5: Input your Samsung account credentials into your computer and agree to the terms and conditions that appear.
Step 6: Log in to your account after resetting the Smart Hub on the TV to see if the problem persists.
Method 3: You Need to Upgrade Your TV’s OS
Older versions of the firmware software are likely to be at fault. If you haven’t updated the firmware of your Samsung Smart TV in a while and want to ensure compatibility with the latest features, you should do so by following the steps outlined in this article.
Step 1: To begin, power up your Samsung TV and select the Settings menu from the remote.
Step 2: Move the arrow to the Support option using the left button and the OK button.
Step 3: To get the most recent version of the software, go to the settings menu and select the update software option.
You can also update the TV’s software by downloading it from the manufacturer’s website onto a USB stick, connecting the stick to the TV, and running the update from there.
You can either update the software via the internet by selecting the NO button, or you can click the YES button to install the most recent version. After finishing the Updating process, you should verify that the issue has been resolved or move on to the subsequent possible solutions.
Method 4: Invoke Smart HUB Reset
According to a large number of customers, the Smart HUB is to blame for the Samsung TV problem of not being able to connect to the server. That being said, you could try resetting the Smart HUB to factory settings on your Samsung TV.
Step 1: To change the settings on your Samsung television, power it on and then select the option.
Step 2: Activate the TV’s menu of options now.
Step 3: Use the OK button on the left to navigate to the Support menu item and click it.
Step 4: Next, proceed to the Self-Diagnosis section.
Step 5: Next, select the Smart HUB’s Reset button.
Step 6: To reset Smart HUB, enter the PIN in the text box below and press OK.
Step 7: Wait for the Samsung TV to restart after entering the PIN, and then proceed with the TV’s setup.
Step 8: Check to see if the issue has been resolved once you’ve finished with all the other steps.


