Have you ever needed to capture a moment on your screen but weren’t sure how to do it on your Chromebook? Don’t worry, we’ve got you covered.
This article will guide you through the simple process of taking screenshots on a Chromebook, with or without the Windows key, using the keyboard, on touchscreen devices, and specifically on Acer Chromebooks.
Contents
Taking a Screenshot on a Chromebook
Chromebooks, Google’s suite of laptops, have an easy process for taking screenshots that’s a bit different from Windows or Mac. Here’s the basic method:
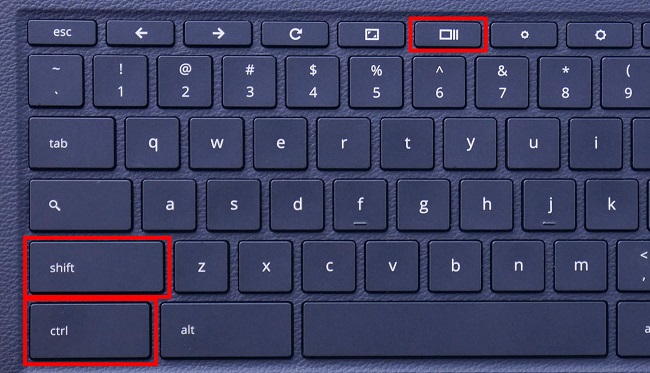
- Full Screenshot: To capture the entire screen, hold down the ‘Ctrl’ key and press the ‘Switch Window’ key. The ‘Switch Window’ key features an icon of a rectangle followed by two lines and is typically located in the function row (F5 key on a standard keyboard).
- Partial Screenshot: If you only want to capture a part of the screen, hold down ‘Ctrl’ and ‘Shift’, then press the ‘Switch Window’ key. The cursor will change to a crosshair. Click and drag to select the area of the screen you want to capture.
The captured screenshot will automatically be saved in the ‘Downloads’ folder as a PNG file.
How to Screenshot on a Chromebook Touchscreen
If you have a touchscreen Chromebook, you can also take a screenshot using the tablet mode. Here’s how:
- To capture the entire screen, press the ‘Power’ and ‘Volume Down’ buttons at the same time.
- To take a partial screenshot, you’ll need to use the stylus (if your device came with one). Open the stylus tools and click on ‘Capture Screen’ for a full screenshot, or ‘Capture Region’ to select a portion of the screen.
Taking a Screenshot Without a Windows Key
Chromebooks do not come with a Windows key. As such, the process of taking screenshots is inherently without a Windows key. The ‘Switch Window’ key acts as the primary button for screenshots, used in conjunction with ‘Ctrl’ and ‘Shift’ keys.
Taking a Screenshot with a Keyboard on Chromebook
The process of taking a screenshot using the keyboard on a Chromebook involves the ‘Ctrl’ and ‘Switch Window’ keys, as detailed above.
Chromebooks are designed with simplicity in mind, and their keyboard layout reflects this, making it easy for users to navigate and use shortcut keys, including those for screenshots.
Taking a Screenshot on an Acer Chromebook
The process of taking a screenshot on an Acer Chromebook is the same as any other Chromebook model.
- For a full screenshot, press and hold the ‘Ctrl’ key, then press the ‘Switch Window’ key.
- For a partial screenshot, press and hold the ‘Ctrl’ and ‘Shift’ keys simultaneously, then press the ‘Switch Window’ key. Use the crosshair to select the area of the screen you wish to capture.
Each screenshot will automatically save to the ‘Downloads’ folder on your Acer Chromebook.
Conclusion
Taking screenshots on your Chromebook, whether it’s an Acer model, a touchscreen device, or any other model, is straightforward once you master the keyboard shortcuts.
With this guide, you can quickly capture your screen and keep a record of important information, memorable moments, or anything else that you’d like to remember. Happy screenshotting on your Chromebook!


