CompatTelRunner.exe is a method used to update your system to the latest Operating System Version or any other Service Pack Upgrades. The CompatTelRunner.exe is also used for diagnosis on your computer to check if there is any chances of compatibility issues and also assembles program telemetry information if opted-in to the Microsoft Customer Experience Improvement Program.
It permits you to confirm compatibility while installing the latest version of the Windows Operating System. This method is all about Windows Update and the KB2977759 is a specific one. It viewpoints the compatibility updates for Windows 7 RTM (Release to Manufacturer). There are many updates that serve as planning to update to the latest OS version, and this update is one of them.
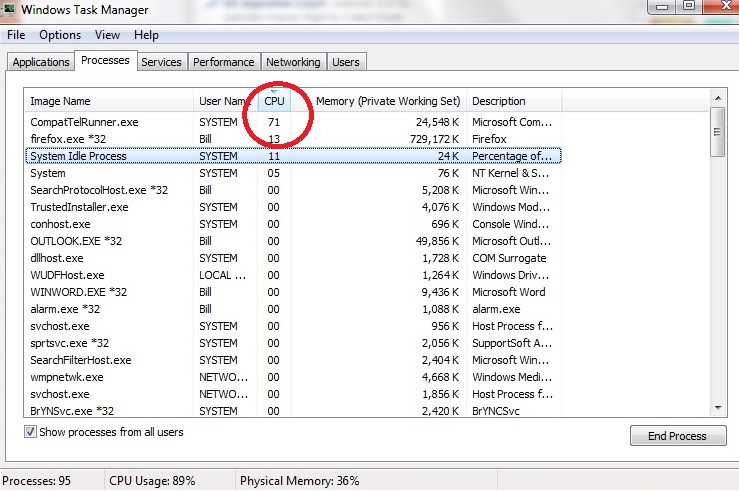
This process slows down your PC, so every user wants to get rid of it. Many of the users also mentioned that there are multiple CompatTelRunner.exe files in the Task Manager that consumes CPU and Disk Usage. This process is not really needed to be performed, it can be deleted but you should run the compatibility checks to diagnose the system by itself.
This file is located in the Sytsem32 folder and it is possessed by the TrustedInstaller. And if you try to modify this, you will encounter an error “Access is denied”. This simply means that you cannot delete or modify it in any way. It happens only because TrustedInstaller is the owner of this process and it only performs Read Only permission over it. Hence, you can change it or modify it.
All you need to do is to take the ownership of the process, after this, you will be able to delete it without removing the whole Windows update and solve your problem or you can let the problem remain, just disable the Scheduled Tasks which executes the program.
Contents
How to Fix CompatTelRunner.exe High CPU and Disk Usage Problem
Solution 1 – Take Ownership of CompatTellRunner.exe, and Delete It
Before proceeding, make sure that you are logged in as an administrator and do not skip any steps below.
Step 1 – Press the Windows key on your keyboard, or click on the Windows icon at the end of the taskbar, to open your Start menu.
Step 2 – A search box will appear type compattelrunner.exe. Keep in mind that you don’t open the file named compattelrunner, and instead right-click on it.
Step 3 – From the dropdown menu select Open the Location. Or, Press R by holding the Windows key. Type C:\Windows|System32 and then type CompatTelrunner.exe in the search bar.
Step 4 – Once you are inside the folder, look for the Compattelrunner.exe file and right-click on it. From the menu select Properties.
Step 5 – A window will open, select the Security tab, and click on the Advanced button inside.
Step 6 – Find the Owner tab, and chose Change owner. A list of new owners will appear to select the account you use and then click on Apply.
Step 7 – Close the prompts that warn you to close all Properties window. Next, you should change the permissions after you have changed the owner. For that, right-click on the Compattelrunner.exe file again and open Properties.
Step 8 – Go to the Security tab and once again click on Advanced. Select Permissions, a list will appear to select the account you are using. A new window with permission options will appear.
Step 9 – Select Full Control and click Apply under the Allow column.
After all the steps performed the ownership transfers from the TrustedInstaller to you, and you will have the full control. You won’t face the error “Access is denied”. You are free to delete it and it will not take over many resources from your system.
There are some solutions to run to delete the entire update. But do not use the KB2977759, as it may create a mess with the entire schedule of Windows Update. Follow the steps mentioned to delete the file safely and your computer will run effectively.
Solution 2: Disable CompatTelRunner.exe from Task Scheduler
The next method is to disable CompatTelRunner.exe from the Task Manager. Follow the steps mentioned below:
Steps 1 – Press R, withholding the Windows key. Now type taskchd.msc and Click OK.
Steps 2 – After this expand Task Scheduler. Go to the Library and then navigate to Microsoft. Then select Windows. Now select Application Experience from the Windows.
Steps 3 – At last, right-click on any of the tasks named as Microsoft Compatibility Appraiser and then select Disable.
Recommended:
- Avast Service High CPU Usages
- Outlook Keeps Asking For Password
- WOW51900319 Error in World of Warcraft
- Modern Setup Host Stopped Working
Conclusion
Once you are done with all the above steps restart your device and check whether the problem remains. We have provided all the solutions that might help you to get rid of the error CompatTelRunner.exe. If you find the error occurring again, try performing the above methods from the beginning and get out of it.


